There is very little in the way of Processor Technology Sol emulators. The first consideration was trying to find on in the MESS emulator. It does exists, but apparently is not functional. So after some additional attempts, a suitable emulator has been found for the Sol-20
SolACE
The name is an acronym for Sol Anachronistic Computer Emulation. I must say this is one of the most very well written and useable single machine emulators I had the pleasure of using… even though it hasn’t been updated since 2005!
SolACE runs on Windows only. I have tested it in Windows 8.1 and it runs just fine despite its age. There are no compatibility issues so far. I have not tested it in any virtual machine “Windows emulation” that may be availalbe on a Mac or in Linux.
The emulator operates only as a Sol-20. It supports dual (virtual) cassettes and dual (virtual) floppy drives. To get started right away, you can download the emulator near the bottom of this page: http://sol20.org/solace.html
Un-ZIP the contents into a folder of your own choosing. The emulator requires no special installation or configuration needs. It simply runs from a single executable. When you run it, you get a screen that looks like this:
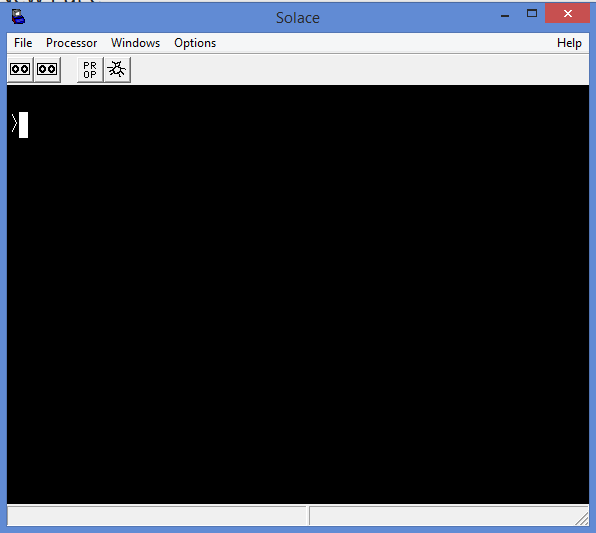
By default, you only get a single prompt, which is true to the real Sol-20. You may notice the button bar just under the window menu. It contains two buttons that look like cassette tapes. These allow you to load/save virtual cassette files that behave just like original Sol-20 cassettes. The right most button activates the Intel 8080 debugger that’s built into the emulator. Unless you want to learn this system at the microprocessor level, you’ll most likely not be using that feature much. The button marked “P R O P” opens the emulator’s options window. We might as well go straight in there and change some settings to be a little more permanent for future use. Clicking that button will display this window:
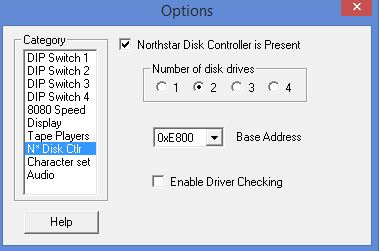
Most likely, you’ll be seeing the DIP Switch 1 option selected, but unless you wanted to toy around with hardware configuration, the only options you will usually be adjusting are Display, N* Disk Ctlr, and Audio.
Clicking on Display will show you screen color options. You can choose between white, amber, or green text. The Hide Mouse option just prevents the mouse pointer from showing anytime the pointer is hovering over the emulator window.
Clicking on N* Disk Ctlr allows you to both activate and define how many disk drives you want to add to the emulator system. I recommend activating this. Make sure Northstar Disk Controller is Present is selected and choose the number of drives. The default “2” will be fine for regular use. Also, don’t change the Base Address from 0xE800, or some of the included Sol-20 software won’t work.
Finally, clicking on Audio will let you turn on system sounds. Not only does this include the simulation of the Sol-20’s naturally generated spurious sound emissions, but you can simulate the sound of the Sol-20 cooling fan and the sound of the disk drives in operation. The Sol-20 didn’t have built in sound. Many of the S-100 systems at the time allowed the creative programmer to generate electrical interference (EI) that could be picked up on almost any AM radio. You would just put the radio up against the computer to pick up “sound.” Select Enable Audio to turn sound on, then slide the volume levers up to allow the respective sounds to be heard. You can adjust the volumes out of relation to each other, like making the fan noticeable, but quiet. Or you can make the disk drives LOUD compared to system sounds (EI/DI audio), like if you’re one of those people who like to hear the hardware noises more than the software noises. 🙂
When done, simply close the Options window. Your settings are now in effect. You save them permanently for future use, click on the SolACE Options MENU ITEM (not the Options button) and choose Save Options from the menu.
Now… time to have fun with this emulator! There is a well written usage guide that came with this emulator. It is a text file called readme.txt. Most of what is written below will be directly excerpted from that document, although you should be able to read that document directly by opening it up from the folder where you copied SolACE. Excerpted text will be formatted like this:
So you've downloaded Solace and have gotten this far.  Now what?

When you fire up Solace, you will be greeted with a black screen
with the SOLOS prompt in the upper left, like this:

      >
This way, you’ll know where any instruction on this page came from if you need to do further research.
The Sol-20 in its machine form, and as emulated here, isn’t really ready to do anything much upon powerup, even though you get a starting prompt. The first thing you must do is decide what you want to load. Anything loaded into the Sol-20 gets loaded to a specific memory address. You will get clues to the address as you load the many programs and games. Once something is loaded, you would issue the command EX xxxx where xxxx is the starting memory address for the program. One other issue to note, you should turn on caps-lock when issuing commands to the Sol-20 emulator. It is possible to type in lowercase letters, but the Sol-20 makes a distinction. Therefore, the command EX will fail if it is typed as ex
What you probably want to do is load a game or BASIC and run that.
Go to the "File" menu item, select "Load Program...", then pick, say,
"targ.ent".  After loading the program, for about four seconds you
will see "program load address is $0000" appear on the statusbar.

Then type "EX 0" (that is, execute the program starting at address
hex 0000).  When tired of that program, select from the Processor
menu the "Warm reset", then load another program.
Not a bad quick start to the emulator, but what you did there was “bypass the system” so to speak and loaded a program under the emulator’s rules. If you want emulate the real process, by “inserting a tape” and loading it, try it this way:
For a more authentic experience, select the menu "File/Tape 1"
item.  From the File menu item on the tape control panel, load
a .SVT (Sol Virtual Tape).  Press PLAY on the control panel,
then type "CAT" from SOLOS.  Note the programs that are listed
on the tape.  Press the REWind button on the tape control panel
to rewind the tape.  Noting a program that you want to load,
type "XE <filename>".  Note that BASIC programs can't be loaded
from SOLOS.  First you must execute the proper version of BASIC,
and then "GET" the file from within BASIC.
Now you know what it was like back in the day when we had to WAIT for a program to load from tape! Not a pleasant experience in hindsight, but it is certainly a reminiscing experience to those who remember doing this all the time.
It’s a good thing this emulator supports a “faster” means of loading. Try out the disk drive emulation to launch CP/M. You should already have the Northstar emulation turned on by now.
Click on the leftmost disk icon on the titlebar of the main
window.  Using the file browser, find "cpm_util.svn" and open
it.  From the SOLOS command line, type the command "EX E800".
You should then get a CP/M prompt. Type "DIR" to see what is
on the disk.
This article is only intended to be a primer for getting started with the SolACE emulator. It is recommended you read the readme.txt file that came with the emulator to learn more about actually using the Sol-20. Other than the lack of serial and parallel functionality in the emulator, it seems to offer nearly the complete experience of using a real Sol-20. You should be able to grab a Sol-20 owner’s manual and play around with it. Or for that matter, if you find old computing magazines with Sol-20 program source code in it, you should be able to use that, too.
If you are hungry for more useable software for the emulator, the author provides a link to additional downloadable emulator-ready software at http://sol20.org/programs.html where you can choose from an assortment of cassette, disk, and directly loadable Sol-20 software.